
 You can install Mailspring on Ubuntu using the official Snap Store package, the verified Flatpak on Flathub, or a direct DEB download from the official website or GitHub releases page.
Mailspring is a modern email client that supports Gmail, Outlook, iCloud, Yahoo, FastMail, and any standard IMAP or Office 365 account. The core application is free to use, with optional paid features available for power users.
It features a clean multi-panel interface, unified inbox, thread-based views, and productivity tools such as link tracking, read receipts, snooze, and send later. Frequently listed among the best email clients for Ubuntu, Mailspring is particularly valued by professionals who want a polished, native-looking desktop mail application without running a full browser tab.
This guide provides step-by-step terminal commands for all three installation methods on Ubuntu 26.04, 24.04, and 22.04 LTS, explains the profile storage paths for each package format, covers the gnome-keyring authentication loop fix, and shows how to cleanly remove the application.
If you run into any issues, leave a comment below or contact us directly. We are always here to help.
Snap, Flatpak & DEB Step-by-Step
Install and configure the Mailspring email client on your Ubuntu machine. Learn how to use the official Snap package, add the Flathub remote for Flatpak, download the direct DEB file, and manage local profile directories.
Your choice of installation method affects how your email credentials are isolated from the rest of the system, where downloaded attachments are stored, and how Mailspring receives security updates. We recommend picking a single installation source. Running the Snap and Flatpak versions in parallel can produce duplicate application icons and conflicting credential storage entries.
Mailspring Installation Methods Compared
Review the table below to compare the update behavior, security isolation, and practical trade-offs of each installation format before choosing your preferred method.
| Method | Package Format | Auto Updates | Sandboxed | Best For |
|---|---|---|---|---|
| Snap Store | Snap (Official container) | Yes (automatic background) | Yes | Most users – lowest-friction setup with automatic updates |
| Flatpak (Flathub) | Flatpak (com.getmailspring.Mailspring) | Yes (via flatpak update) | Yes | Users who prefer Flatpak runtimes and Flathub packages |
| Direct DEB Download | Native Debian package (.deb) | No (manual re-download required) | No | Advanced users who want full native system performance without any packaging layer |
Method 1: Install Mailspring via the Snap Store
The Snap package is the official, developer-recommended way to install Mailspring on Ubuntu. It is published directly by the Mailspring team and is the most frequently updated distribution channel. Snap packages run inside a secure, isolated environment that prevents the application from accessing parts of your system it should not need. Update checks run automatically in the background – you do not need to manually re-download the application when new versions are released.
Snap is pre-installed on all standard Ubuntu Desktop editions. If you are running a minimal install or a custom desktop setup, confirm that the Snap service is active before proceeding: systemctl status snapd.
Open a terminal window using Ctrl+Alt+T and run the Snap installation command:
sudo snap install mailspring
Once the installation completes, launch Mailspring from your application menu or by typing mailspring in a terminal. The first-run wizard will guide you through adding your first email account.
Method 2: Install Mailspring via Flatpak (Flathub)
The Flatpak version of Mailspring is published on Flathub under the application ID com.getmailspring.Mailspring. Flatpak is an alternative packaging format that runs applications inside their own isolated environment. Like the Snap version, it handles automatic updates and keeps the application separated from the rest of your system. If you already use other Flatpak applications, this method lets you manage everything in one place.
By default, Flatpak limits what folders Mailspring can see on your computer. If you need to attach documents from an external drive or a secondary partition, you can grant it access using the permission commands in Step 4 below.
If Flatpak is not already installed on your system, add it from Ubuntu’s default repository:
sudo apt install flatpak -y
Configure Flathub as a trusted remote package source on your system. This only needs to be done once:
sudo flatpak remote-add --if-not-exists flathub https://dl.flathub.org/repo/flathub.flatpakrepo
Retrieve and install the verified Mailspring Flatpak package from Flathub:
flatpak install flathub com.getmailspring.Mailspring -y
If you encounter “Permission Denied” errors when attaching local files, grant the Flatpak container access to external drives or system directories:
# Allow access to secondary drives mounted under /media
flatpak override --user --filesystem=/media com.getmailspring.Mailspring

# Allow access to mounts under /mnt
flatpak override --user --filesystem=/mnt com.getmailspring.Mailspring

# Grant full host filesystem read/write access
flatpak override --user --filesystem=host-os com.getmailspring.Mailspring
To undo these permission changes and return Mailspring to its default restricted access: flatpak override --user --reset com.getmailspring.Mailspring.
Method 3: Install Mailspring via Direct DEB Download
If you prefer a native installation without any packaging layer, you can download the .deb package directly from the official Mailspring download page or from the GitHub releases page. A .deb file is the standard Ubuntu installation package format – similar to a .exe installer on Windows. This method gives Mailspring full access to your local folders without any access restrictions.
The main trade-off is that Mailspring does not publish a public APT repository, so automatic system-wide updates will not apply. You must manually check the download page and repeat the installation steps when a new version is released.
Visit getmailspring.com/download to grab the latest .deb file, or download directly from the GitHub releases page using wget:
cd ~/Downloads
wget https://github.com/Foundry376/Mailspring/releases/latest/download/mailspring-amd64.deb
Use apt install (rather than dpkg) to install the package. The apt command automatically resolves and installs any missing system libraries the package depends on:
sudo apt update && sudo apt install ./mailspring-*.deb -y
The direct DEB package does not register an APT repository, so sudo apt upgrade will not update Mailspring. Check the GitHub releases page periodically and repeat Steps 1 and 2 to apply new versions. Always close Mailspring before reinstalling to avoid configuration database conflicts.
Mailspring Profile and Configuration Paths
Mailspring stores your account settings, cached mail data, and local preferences in a configuration directory on your system. The exact path depends on which installation method you used. If you switch between installation formats – for example, from a DEB install to Snap – Mailspring will load as a blank application because it looks for its data in a different location. You can manually copy the configuration directory to restore your setup without re-entering your account credentials.
~/.config/Mailspring/• Snap Installation:
~/snap/mailspring/common/.config/Mailspring/• Flatpak Installation:
~/.var/app/com.getmailspring.Mailspring/config/Mailspring/Ensure Mailspring is fully closed before running any of these copy commands. Run the pair that matches your migration direction:
# Step A: Create a compressed backup of your DEB configuration
tar -cvzf mailspring-backup.tar.gz -C ~/.config Mailspring

# Step B: Copy DEB config to Snap directory
mkdir -p ~/snap/mailspring/common/.config/
cp -a ~/.config/Mailspring ~/snap/mailspring/common/.config/

# Step C: Copy DEB config to Flatpak directory
mkdir -p ~/.var/app/com.getmailspring.Mailspring/config/
cp -a ~/.config/Mailspring ~/.var/app/com.getmailspring.Mailspring/config/

# Step D: Migrate Snap config back to DEB directory
mkdir -p ~/.config/
cp -a ~/snap/mailspring/common/.config/Mailspring ~/.config/

# Step E: Migrate Flatpak config back to DEB directory
mkdir -p ~/.config/
cp -a ~/.var/app/com.getmailspring.Mailspring/config/Mailspring ~/.config/
The tar command creates a compressed archive of your configuration folder – similar to a .zip file – so your data is safely backed up before any migration operation.
Mailspring User Interface Screenshot
Below is a visual layout demonstrating the Mailspring application interface running on an Ubuntu environment.
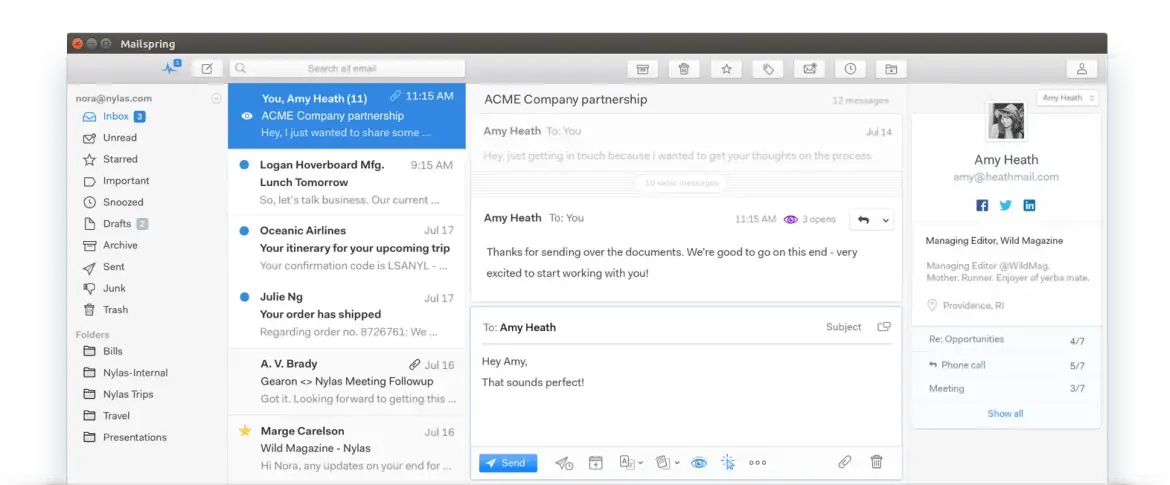
Mailspring User Interface Screenshot
Below is a visual layout demonstrating the Mailspring application interface running on an Ubuntu environment.
How to Completely Uninstall Mailspring from Ubuntu
Uninstalling an application package does not automatically delete your local configuration data. To perform a complete, clean removal – for example, before switching to a different email client or before a fresh reinstall – you must remove both the application binaries and the local configuration directory. Run the commands below that match the format you originally used to install Mailspring.
1. Uninstall the Snap Package:
sudo snap remove --purge mailspring
2. Uninstall the Flatpak Package:
flatpak uninstall -y com.getmailspring.Mailspring
flatpak uninstall --unused -y
3. Uninstall the Direct DEB Package:
sudo apt purge -y mailspring
sudo apt autoremove -y
4. Delete Leftover Configuration and Cache Directories:
Package manager commands do not delete your local configuration data. Run the cleanup commands matching the format you removed:
## Clean up DEB installation directories
rm -rf ~/.config/Mailspring ~/.cache/Mailspring

## Clean up Snap installation directories
rm -rf ~/snap/mailspring

## Clean up Flatpak installation directories
rm -rf ~/.var/app/com.getmailspring.Mailspring
Troubleshooting Common Mailspring Issues on Ubuntu
The issues below cover the most frequently reported problems with Mailspring on Ubuntu, including the gnome-keyring authentication loop that affects users on certain desktop environments and display-related startup errors.
This is the most widely reported issue by Ubuntu users. On startup, Mailspring prompts you to unlock a keyring or enter a password to store credentials. After typing your password the same dialog appears again in a loop, and the application appears stuck on the account setup screen.
Root cause: Mailspring uses libsecret to store email account credentials securely via the system keyring (typically gnome-keyring). On minimal setups, KDE Plasma sessions, or systems where the default keyring has been renamed or locked, libsecret cannot unlock the keyring and enters a retry loop.
Fix Option 1 – Reset the default keyring via Seahorse (Recommended for GNOME):
# Install Seahorse (GNOME Keyring Manager) if not present
sudo apt install seahorse -y

# Open Seahorse from your application menu
# Navigate to: Passwords > Default keyring
# Right-click > Change Password > Set the password to empty (blank)
# This allows automatic keyring unlock on login without a prompt
Fix Option 2 – Use a plain text password store (Quick workaround for all environments):
# For DEB or Snap version - run from terminal
mailspring --password-store=basic

# For the Flatpak version
flatpak run com.getmailspring.Mailspring --password-store=basic
To make this flag permanent, copy the desktop file and edit the Exec= line:
cp /usr/share/applications/mailspring.desktop ~/.local/share/applications/
# Open the file and change:
#   Exec=mailspring %U
# to:
#   Exec=mailspring --password-store=basic %U
# Save and log out and back in for the change to take effect.
Fix Option 3 – Install gnome-keyring on non-GNOME desktops (KDE Plasma, Openbox):
sudo apt install gnome-keyring libsecret-1-0 libsecret-tools -y
# Log out and log back in after installation so the keyring service starts
Mailspring is built on Electron, which uses GPU hardware acceleration by default. On systems with certain NVIDIA, AMD, or Mesa driver configurations, this can cause the application window to appear black or render incorrectly. Launch Mailspring with GPU acceleration disabled to resolve this:
# DEB or Snap installation
mailspring --disable-gpu

# Flatpak installation
flatpak run com.getmailspring.Mailspring --disable-gpu
If this resolves the issue, make the --disable-gpu flag permanent by editing the desktop entry file using the same method described in Fix Option 2 above.
If Mailspring connects but shows a “connection error” or loops on the account setup screen, verify your network and firewall settings. Confirm that ports 993 (IMAP), 587 (SMTP), and 443 (HTTPS) are open. For the Snap version, check the active network connections with:
snap connections mailspring
Use these official links for setup assistance, bug reports, and community discussions:
Mailspring for Ubuntu FAQ
Find quick answers to common questions about installing, configuring, and maintaining Mailspring on Ubuntu.
Is Mailspring free to use on Ubuntu?
The core Mailspring application is free to download and use. Advanced features such as link tracking, read receipts, email templates, contact profiles, and scheduled sending require a Mailspring Pro subscription, which is billed monthly.
How do I install Mailspring on Ubuntu using Snap?
Open a terminal window using Ctrl+Alt+T and run: sudo snap install mailspring. The Snap version is the official developer-recommended package and includes automatic background updates.
Where does Mailspring store its configuration data on Ubuntu?
The configuration directory depends on your installation format. The native DEB version stores data in ~/.config/Mailspring/, the Snap version uses ~/snap/mailspring/common/.config/Mailspring/, and the Flatpak version uses ~/.var/app/com.getmailspring.Mailspring/config/Mailspring/.
How do I fix the Mailspring password loop or keyring authentication error on Ubuntu?
This issue occurs when Mailspring’s libsecret credential storage cannot access or unlock the system gnome-keyring. The fastest fix is to launch Mailspring with the --password-store=basic flag, which uses a local plain text credential file instead. A more permanent solution is to open Seahorse (GNOME Keyring Manager), navigate to Passwords > Default keyring, and set an empty password so the keyring unlocks automatically on login. See the Troubleshooting section above for the full step-by-step commands.
How do I completely uninstall Mailspring from Ubuntu?
Run the removal command matching your installation format, then delete the leftover configuration directory. For Snap: sudo snap remove --purge mailspring followed by rm -rf ~/snap/mailspring. For Flatpak: flatpak uninstall -y com.getmailspring.Mailspring followed by rm -rf ~/.var/app/com.getmailspring.Mailspring. For the DEB version: sudo apt purge -y mailspring followed by rm -rf ~/.config/Mailspring.
More Ubuntu email and application guides: Best Email Clients for Ubuntu · Thunderbird for Ubuntu · Geary for Ubuntu · Install BlueMail on Ubuntu · Android Studio on Ubuntu