You can install AnyDesk on Ubuntu using the official native DEB repository or by configuring the Flatpak package from Flathub.
AnyDesk is a widely used remote desktop application that enables secure, low-latency screen sharing, unattended access, and file transfer between different operating systems. For personal and non-commercial use, AnyDesk provides a free tier with device restrictions, while commercial users require a paid subscription.
This guide provides step-by-step terminal instructions for installing AnyDesk on Ubuntu 24.04 and 26.04 LTS. We cover the recommended DEB822 repository configuration, Flatpak setup, and critical display server configurations required to overcome Wayland session limitations.
If you encounter any issues during the installation or configuration, please leave a comment below or contact us directly for troubleshooting assistance. We are happy to help you get connected.
Official DEB, DEB822 Repository & Flatpak Guides
Configure secure remote desktop access on your Ubuntu machine. Resolve default Wayland incoming session issues, clean up duplicate APT repositories, and manage local UFW firewalls.
Choosing the correct installation method determines how AnyDesk receives system updates and interacts with security configurations. Reviewing the available options ensures you pick the best configuration for your administration preferences.
AnyDesk Installation Methods Compared
Use the comparison table below to review features, package base, repository automation, and compatibility differences.
| Method | Source | Automatic Updates | Sandboxing & Security | Best Fit / Recommendation |
|---|---|---|---|---|
| APT Repository (DEB822) | deb.anydesk.com (Official) |
Yes (Integrated via standard apt upgrade) |
None (Runs with native privileges) | Recommended Default – Simplest installation for system-wide updates. |
| Manual DEB Download | anydesk.com/downloads/linux (Official) |
No (Requires manual re-download of packages) | None (Runs with native privileges) | Useful for offline machines or controlled deployments. |
| Flatpak (Flathub) | Flathub (Community-maintained; unverified) | Yes (Managed via Flatpak update systems) | Isolated (Requires manual Flatseal overrides) | For users who prefer container isolation; may block some features. |
Note: AnyDesk does not distribute or maintain packages on the official Snap Store. For default setups on Ubuntu, configuring the native APT repository remains the most stable path.
Method 1: Install AnyDesk via the Official APT Repository (DEB822 Format)
Ubuntu and Debian recommend using the modern DEB822 repository format. This secure standard links a software package directly to its official security key. By doing so, it prevents your system from accidentally accepting updates signed by other, untrusted sources, keeping your system safe and stable.
Open a terminal session and update your local package database to prevent conflict issues, then install the necessary dependencies for key handling and repository transport:
sudo apt update && sudo apt upgrade -y
sudo apt install ca-certificates curl gpg -y
Download the official AnyDesk GPG public key and convert it to a binary keyring. We store it inside /usr/share/keyrings. The --yes flag enables the command to overwrite the keyring cleanly if you need to re-run it:
curl -fsSL https://keys.anydesk.com/repos/DEB-GPG-KEY | sudo gpg --dearmor --yes -o /usr/share/keyrings/anydesk.gpg
Note: AnyDesk recommends updating keys installed prior to February 2025 to maintain repository compatibility.
Create a new repository configuration source file named anydesk.sources inside the APT directory by executing this command:
printf '%s\n' \
'Types: deb' \
'URIs: https://deb.anydesk.com' \
'Suites: all' \
'Components: main' \
'Signed-By: /usr/share/keyrings/anydesk.gpg' | sudo tee /etc/apt/sources.list.d/anydesk.sources > /dev/null
Confirm the configuration file content is written correctly:
cat /etc/apt/sources.list.d/anydesk.sources
Update your system’s package list to read the new AnyDesk repository details. Then, check that the package is available for installation:
sudo apt update
apt-cache policy anydesk
Expected output should list deb.anydesk.com as the candidate package source.
Install the AnyDesk package from the repository:
sudo apt install anydesk -y
Verify that the AnyDesk service daemon is active and running:
dpkg -l anydesk | grep '^ii'
systemctl is-enabled anydesk
systemctl is-active anydesk
Method 2: Install AnyDesk from Flathub (Flatpak)
If you prefer to run applications inside isolated containers, you can install the community-maintained AnyDesk package from Flathub. Note that because Flatpak apps are restricted for security, you may need to grant extra permissions (using a tool like Flatseal) for remote control and mouse clicks to work correctly.
If Flatpak is not already available on your system, install the package from Ubuntu’s base repositories:
sudo apt install flatpak -y
Add the Flathub repository to your Flatpak config. This enables access to Flathub’s catalog at the system scope level:
sudo flatpak remote-add --if-not-exists flathub https://dl.flathub.org/repo/flathub.flatpakrepo
Confirm the Flathub remote is configured successfully:
flatpak remotes
Check the remote metadata and branch info before executing the installation commands:
flatpak remote-info flathub com.anydesk.Anydesk
Install the Flatpak package:
sudo flatpak install flathub com.anydesk.Anydesk -y
Verify the installed app package details:
flatpak info com.anydesk.Anydesk
Method 3: Install AnyDesk via Manual DEB Package Download
If you need to install AnyDesk on a computer without an internet connection, you can download the standalone .deb package file from the official website and install it manually. Note that manual installations do not register updates automatically, so you will have to manually download newer versions in the future to get updates.
Navigate to the official AnyDesk Linux Download Center or use wget to fetch the package directly from your command terminal:
wget https://download.anydesk.com/linux/anydesk_8.0.2-1_amd64.deb
Avoid using dpkg -i, as it may fail when missing dependencies. Instead, run apt install with the local path. This forces APT to resolve and fetch any missing helper libraries (such as libminizip1 or desktop display libraries) from the Ubuntu base repositories:
sudo apt install ./anydesk_8.0.2-1_amd64.deb -y
Resolving Wayland Compatibility & GDM Configuration Issues
Modern versions of Ubuntu (including Ubuntu 24.04 and 26.04 LTS) use a display system called Wayland by default. While Wayland is fast and secure, its security rules prevent remote desktop applications from seeing your screen or controlling your mouse and keyboard.
If you connect to an AnyDesk session while running Wayland, you might see a black screen, a “Waiting for image” message, or your mouse clicks might not do anything on the remote screen. The most reliable way to fix this is to switch your computer to use the traditional X11 (Xorg) display system instead.
You can switch your current session to X11 temporarily without editing system files:
- Save your work and log out of your current session.
- On the GDM login interface, click your username to show the password prompt.
- Click the **gear icon** located in the bottom-right corner of the display.
- Select **Ubuntu on Xorg** (or **Ubuntu on X11**) from the pop-up options.
- Enter your password and complete the login.
You can verify that your active display server has switched to X11 by running this command in your terminal:
echo $XDG_SESSION_TYPE
Expected output: x11
If you are setting up a remote server or a machine that you need to access regularly without anyone sitting at it, you can disable Wayland system-wide:
- Open the GDM3 configuration file in your terminal editor:
sudo nano /etc/gdm3/custom.conf
- Locate the following configuration line:
#WaylandEnable=false
- Uncomment this key parameter by removing the leading hash character:
WaylandEnable=false
- Save changes and exit the nano editor (press Ctrl+O, then Enter, then Ctrl+X).
- Restart your system to apply changes:
sudo reboot
Enterprise Deployments & Unattended Access Configuration
For system administrators managing multiple computers or remote servers without a monitor (headless servers), AnyDesk offers command-line tools to register licenses, set passwords, and manage settings directly from the terminal.
1. Register Your Commercial License:
Activate your corporate subscription directly from the terminal by piping your license key:
echo "your_license_key_here" | sudo anydesk --register-license
2. Set a Permanent Unattended Access Password:
Allow direct incoming connections without requiring manual remote confirmation (essential for headless servers):
echo "your_secure_password_here" | sudo anydesk --set-password
3. Access Client Settings from Command Line:
Open specific settings menus directly without browsing the standard graphical client window:
# Open standard settings menu
anydesk --settings

# Open administrator-level system settings
sudo anydesk --admin-settings
4. Deploying Custom Enterprise Clients (.deb):
Admins utilizing custom-branded clients with pre-configured access lists can download their unique package from the AnyDesk portal and install it cleanly:
sudo apt install ./anydesk-enterprise_*_amd64.deb -y
AnyDesk User Interface & Screenshots
Below is a screenshot gallery demonstrating the active AnyDesk user interface and remote control options running on Ubuntu Desktop.
-
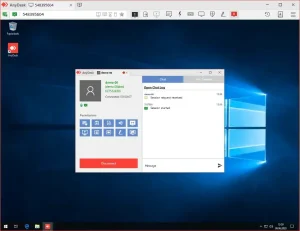
- Anydesk connected to windows 10 remotely from How to Install AnyDesk on Ubuntu 26.04 – Complete Guide
-
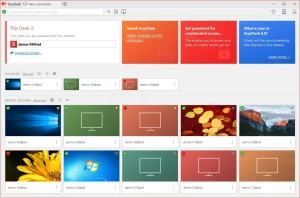
- Anydesk new connection on ubuntu from How to Install AnyDesk on Ubuntu 26.04 – Complete Guide
-
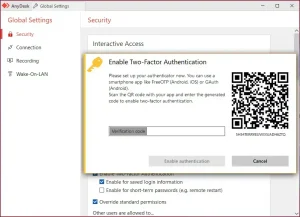
- 2 factor auth with anydesk from How to Install AnyDesk on Ubuntu 26.04 – Complete Guide
AnyDesk Video Installation Guide
If you prefer a visual walkthrough, you can watch our step-by-step video tutorial demonstrating the DEB installation process and how to resolve the Wayland black screen issue on Ubuntu:
How to Completely Uninstall AnyDesk and Revert System Changes
If you need to remove AnyDesk from your system, verify that you deactivate background services, clean up APT keyrings, and remove local user configuration files to prevent system updates warnings or configuration conflicts.
Choose the appropriate command blocks depending on your initial installation method:
For APT (Native Repository & Manual DEB):
sudo apt remove anydesk --purge -y
For Flatpak (Flathub):
sudo flatpak uninstall com.anydesk.Anydesk -y
If you configured the APT repository sources, remove the repository configuration and GPG key files to clean up your package lists database:
sudo rm -f /etc/apt/sources.list.d/anydesk.sources
sudo rm -f /usr/share/keyrings/anydesk.gpg
sudo apt update
Clear any leftover orphaned packages no longer needed by system processes:
sudo apt autoremove --purge -y
Clean up system config and remote credentials files from your system directories:
rm -rf ~/.anydesk
sudo rm -rf /etc/anydesk
Use the resources below to access official community support and developer documentation files:
Troubleshooting AnyDesk on Ubuntu
Below are common configuration errors and troubleshooting procedures for resolving connection and repository issues.
If executing sudo apt update returns a GPG signing error, re-fetch the official keyring:
curl -fsSL https://keys.anydesk.com/repos/DEB-GPG-KEY | sudo gpg --dearmor --yes -o /usr/share/keyrings/anydesk.gpg
sudo apt update
If APT reports conflicting or duplicate repository warnings, inspect your active source lists:
ls /etc/apt/sources.list.d/*anydesk*
Delete any older legacy repository lists to keep only the DEB822 file active:
sudo rm -f /etc/apt/sources.list.d/anydesk-stable.list
sudo rm -f /etc/apt/sources.list.d/extrepo_anydesk.sources
sudo apt update
If outbound internet connections function properly but incoming direct connection requests fail, ensure your local UFW firewall configuration permits traffic on AnyDesk’s required ports. Run the following rules to allow connection traffic:
sudo ufw allow 6568/tcp comment "AnyDesk direct connection TCP"
sudo ufw allow 50001:50003/udp comment "AnyDesk discovery UDP"
sudo ufw reload
If you cannot accept connections, verify that the background system daemon is active and running:
systemctl status anydesk
Enable and start the service if it is stopped or disabled:
sudo systemctl enable anydesk
sudo systemctl start anydesk
Frequently Asked Questions
Why does AnyDesk show a black screen or block remote control on Ubuntu?
This issue is caused by the Wayland display server, which is enabled by default in Ubuntu 24.04 and 26.04. Wayland’s security model isolates graphical applications, preventing third-party remote desktop software from capturing display buffers or injecting synthetic mouse and keyboard inputs. Switching to the X11 (Xorg) display server resolves this limitation.
How do I switch from Wayland to Xorg (X11) on Ubuntu?
You can switch sessions at the GDM login screen. Log out, click your username, click the gear icon in the bottom-right corner, select “Ubuntu on Xorg” (or “Ubuntu on X11”), and log in. To permanently disable Wayland, edit /etc/gdm3/custom.conf, uncomment WaylandEnable=false, and reboot.
Is there an official Snap package for AnyDesk?
No, there is no official Snap package for AnyDesk. Because Snap packages run inside a strictly confined sandbox (AppArmor), they cannot access the system-level display capture endpoints or inject input events. AnyDesk requires a root systemd service daemon (anydesk.service) that violates default Snap sandboxing.
How do I update AnyDesk on Ubuntu?
If you installed AnyDesk using the official APT repository (DEB822 format), it receives updates automatically alongside other system applications. Running sudo apt update && sudo apt upgrade will apply any updates. If you used Flatpak, run flatpak update com.anydesk.Anydesk.
How do I resolve duplicate AnyDesk source list errors in APT?
Conflicting source entries occur when legacy repository configurations coexist with newer DEB822 source files. Run ls /etc/apt/sources.list.d/*anydesk* to find duplicate sources, delete older configurations (such as anydesk-stable.list or extrepo_anydesk.sources) using sudo rm, and run sudo apt update.
More remote connection and utility guides: TeamViewer on Ubuntu · Discord on Ubuntu · Best Remote Desktop Software · Remmina on Ubuntu