You can install OnlyOffice on Ubuntu using the official native DEB package, the sandboxed Flatpak container, or the official Snap package.
OnlyOffice Desktop Editors is a powerful, highly compatible, open-source office suite that offers a comprehensive alternative to Microsoft Office. It combines document, spreadsheet, and presentation editors in a single tabbed desktop application that runs completely offline or connects to cloud accounts for real-time collaboration.
This guide provides complete, step-by-step terminal instructions for installing OnlyOffice on Ubuntu 26.04, 24.04, and 22.04 LTS. We cover native package configurations, Flatpak sandboxing font permissions, and Snap interface setup for external storage and printing.
If you encounter any issues during the installation, please leave a comment below or contact us directly for personal troubleshooting assistance.
DEB, Flatpak & Snap Setup Guide
Configure the modern, open-source office productivity suite on your Ubuntu workstation. Fix sandbox font rendering, enable external storage, and establish stable printing services.
Selecting the right installation format determines how updates are delivered and whether the application can interface with local system folders, audio channels, and hardware printers. Compare the technical features below to determine the best method for your workspace.
OnlyOffice Installation Methods Compared
Review the comparison below to decide between native DEB integration, containerized Flatpak, and official Snap packaging.
| Method & Link | Package Source | Updates Delivery | Sandboxing & Privacy | System Integration |
|---|---|---|---|---|
| Native DEB | Official ONLYOFFICE CDN | Manual downloads or manual repo config | None (Full system permissions) | Excellent. Seamless printer and system font access. |
| Flatpak (Flathub) | Flathub Repository (Official) | Automatic via Flatpak daemon | Strict sandbox. Isolated filesystem paths. | Good. Requires overrides to load custom system fonts. |
| Snap (Snap Store) | Canonical Snap Store (Official) | Automatic via snapd service | Standard snap confinement. Restricted by default. | Good. Requires connecting interface plugs for USB and printers. |
Method 1: Install OnlyOffice via Native DEB
The native Debian package (.deb) is the recommended installation method for Ubuntu systems. It installs files directly into system directories, avoiding sandboxing limitations, enabling seamless access to files on external partitions, and utilizing system-wide fonts. Follow these terminal instructions to download and install OnlyOffice.
Use wget to retrieve the stable Debian installer from ONLYOFFICE’s official servers based on your system architecture:
For AMD64 (Standard 64-bit PCs):
wget https://download.onlyoffice.com/install/desktop/editors/linux/onlyoffice-desktopeditors_amd64.deb
For ARM64 (Raspberry Pi, ARM-based laptops):
wget https://download.onlyoffice.com/install/desktop/editors/linux/onlyoffice-desktopeditors_arm64.deb
Note: If you prefer to download using a web browser, visit the official OnlyOffice Linux Download Page and select the DEB option.
Deploy the downloaded installer using apt, which automatically resolves and retrieves required system dependencies:
For AMD64:
sudo apt update
sudo apt install ./onlyoffice-desktopeditors_amd64.deb -y
For ARM64:
sudo apt update
sudo apt install ./onlyoffice-desktopeditors_arm64.deb -y
If you want ONLYOFFICE to receive automatic software updates alongside other native package updates via APT, configure the official GPG key and repository source:
1. Import the official GPG keyring:
curl -fsSL https://download.onlyoffice.com/GPG-KEY-ONLYOFFICE | gpg --dearmor | sudo tee /usr/share/keyrings/onlyoffice.gpg > /dev/null
2. Add the official debian squeeze repository source:
echo "deb [signed-by=/usr/share/keyrings/onlyoffice.gpg] https://download.onlyoffice.com/repo/debian squeeze main" | sudo tee /etc/apt/sources.list.d/onlyoffice.list
3. Update local databases and install:
sudo apt update
sudo apt install onlyoffice-desktopeditors -y
Method 2: Install OnlyOffice via Flatpak
The Flatpak installation packages OnlyOffice inside an isolated container sandbox. This is ideal if you want to avoid adding third-party native files directly to your operating system libraries. The Flatpak version is officially maintained on Flathub.
If Flatpak is not already configured on your machine, install the Flatpak service and add the Flathub store remote configuration:
sudo apt update
sudo apt install flatpak -y
sudo flatpak remote-add --if-not-exists flathub https://dl.flathub.org/repo/flathub.flatpakrepo
Execute the install command to build the isolated OnlyOffice container:
flatpak install flathub org.onlyoffice.desktopeditors -y
Because Flatpak isolation blocks the software from viewing host filesystems, you must manually grant the container read-only access to host system and local user font paths to render characters and documents correctly:
flatpak override --user --filesystem=xdg-config/fontconfig:ro --filesystem=~/.local/share/fonts:ro --filesystem=/usr/share/fonts:ro org.onlyoffice.desktopeditors
Rebuild the internal Flatpak font cache to apply and verify the permission changes:
flatpak run --command=fc-cache org.onlyoffice.desktopeditors -fv
Method 3: Install OnlyOffice via Snap
The Snap package is officially maintained by ONLYOFFICE’s development team and is available directly in the Canonical Snap Store. It installs in a sandboxed format and receives automatic background updates.
Run the snap installation command in your terminal to deploy ONLYOFFICE:
sudo snap install onlyoffice-desktopeditors
Because the Snap sandbox blocks OnlyOffice from reading documents located on external drives or USB sticks by default, you must manually connect the removable media plug:
sudo snap connect onlyoffice-desktopeditors:removable-media
If you have trouble printing files directly from OnlyOffice, connect the CUPS printing control interface to grant the Snap sandbox access to local printers:
sudo snap connect onlyoffice-desktopeditors:cups-control
Connecting OnlyOffice to Cloud Services
OnlyOffice Desktop Editors can connect directly to self-hosted cloud storage environments like Nextcloud, ownCloud, or ONLYOFFICE DocSpace. This lets you browse and edit cloud-hosted documents from your local desktop application while co-editing in real-time. Follow these steps to establish a connection:
1. Open the Connection Tab: Launch OnlyOffice on your Ubuntu desktop. In the left-hand sidebar menu, click on the Connect to cloud option.
2. Select Your Cloud Service: Choose your cloud portal type by clicking on the logo for Nextcloud, ownCloud, or ONLYOFFICE DocSpace.
3. Enter Portal Domain: In the portal address field, type the complete URL of your self-hosted server (for example, https://nextcloud.example.com) and click the Connect now button.
4. Authorize Connection: A browser window or modal dialog will prompt you to log in to your account. Enter your username and password, then click Authorize to link OnlyOffice to your cloud storage.
Prerequisite: The target Nextcloud or ownCloud server must have the official ONLYOFFICE Integration App installed and configured by an administrator to allow connections.
If your installation process is interrupted or throws package dependency errors (such as unmet dependencies during DEB setup), run the standard APT recovery command to repair your local packages:
sudo apt --fix-broken install
This command instructs the package manager to scan your system configuration, fetch any missing prerequisite shared libraries, and complete the configuration of the OnlyOffice DEB package. After running the recovery command, you can launch the application safely from your desktop environment.
OnlyOffice Desktop Screenshots
View the layout of OnlyOffice Document Editor, Spreadsheet Editor, and Presentation Editor running natively on a dark-themed Ubuntu workstation:
-

- Ai agent for onlyoffice from How to Install OnlyOffice on Ubuntu 26.04 – Complete Guide
-
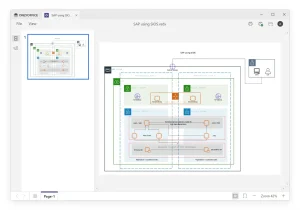
- Diagram new from How to Install OnlyOffice on Ubuntu 26.04 – Complete Guide
-
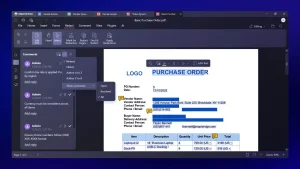
- Editing a pdf in onlyoffice from How to Install OnlyOffice on Ubuntu 26.04 – Complete Guide
-
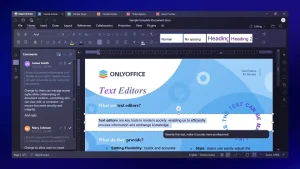
- Sample document from How to Install OnlyOffice on Ubuntu 26.04 – Complete Guide
-
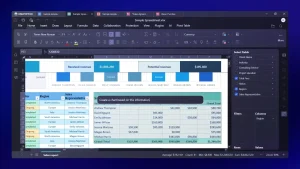
- Sample spreadsheet from How to Install OnlyOffice on Ubuntu 26.04 – Complete Guide
-
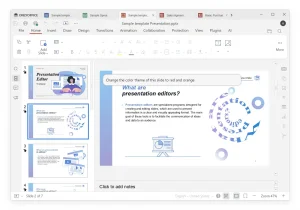
- Slides onlyoffice on ubuntu from How to Install OnlyOffice on Ubuntu 26.04 – Complete Guide
-
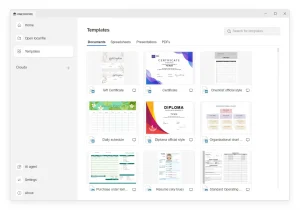
- Templates onlyoffice from How to Install OnlyOffice on Ubuntu 26.04 – Complete Guide
-
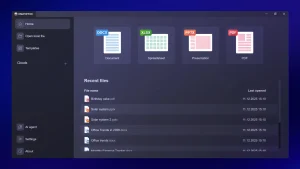
- Home recent files in onlyoffice on ubuntu from How to Install OnlyOffice on Ubuntu 26.04 – Complete Guide
Video Installation Walkthrough
Watch this video walkthrough showing the terminal installation, resolving packaging dependencies, and applying the font sandbox permission fixes:
How to Cleanly Uninstall OnlyOffice
If you need to remove OnlyOffice from your system, choose the command block that corresponds to your installation method to remove the application binaries and purge configuration caches.
To remove the native installation, purge the packages and delete user profile configurations:
sudo apt purge onlyoffice-desktopeditors -y
sudo apt autoremove --purge -y
To delete all saved document presets and template configs, execute the clean command:
rm -rf ~/.config/onlyoffice/ ~/.local/share/onlyoffice/
To uninstall the Flatpak container, delete the package and clean local sandbox settings directories:
flatpak uninstall org.onlyoffice.desktopeditors -y
Wipe the container filesystem overlays folder completely:
rm -rf ~/.var/app/org.onlyoffice.desktopeditors
To remove the Snap package, run the purge command to delete the package and its sandboxed system data:
sudo snap remove onlyoffice-desktopeditors
Refer to the following resources for community support and official documentation:
Frequently Asked Questions
Why are my system fonts missing in the Flatpak version of OnlyOffice?
Flatpak applications run in an isolated container sandbox that cannot view local user fonts by default. To resolve this, you must run the override command in your terminal to grant read-only filesystem access to font paths: flatpak override --user --filesystem=xdg-config/fontconfig:ro --filesystem=~/.local/share/fonts:ro --filesystem=/usr/share/fonts:ro org.onlyoffice.desktopeditors, and then restart the application.
How do I enable OnlyOffice Snap to access files on my USB drive?
Because Snap applications run in a sandboxed environment, they are isolated from external storage devices. You can grant access to USB drives and external hard disks by connecting the removable-media interface using the command: sudo snap connect onlyoffice-desktopeditors:removable-media.
Is OnlyOffice Desktop Editors officially maintained by OnlyOffice?
Yes, both the Snap package (maintained under Ascensio System SIA) and the Flatpak wrapper are officially recognized and maintained. The native DEB package is also built and signed directly by ONLYOFFICE developers.
Which installation method is recommended for OnlyOffice on Ubuntu?
The native DEB package is recommended for the best system integration, direct access to system fonts, and seamless file management. The Flatpak and Snap editions are excellent if you prefer containerized sandboxing, though they require manual overrides for complete hardware and font integration.
How do I cleanly uninstall OnlyOffice and purge all local configuration files?
Depending on your installation type: for DEB, run: sudo apt purge onlyoffice-desktopeditors, and delete ~/.config/onlyoffice/; for Flatpak, run: flatpak uninstall org.onlyoffice.desktopeditors, and delete ~/.var/app/org.onlyoffice.desktopeditors/; for Snap, run: sudo snap remove onlyoffice-desktopeditors.
More office and app installation guides: Microsoft Office Alternatives · WPS Office for Ubuntu · LibreOffice for Ubuntu · Remmina Remote Desktop Client · Install AnyDesk on Ubuntu