You can install qBittorrent on Ubuntu using the native APT package manager with the official stable PPA, or the sandboxed Flatpak package via Flathub.
qBittorrent is a highly popular, open-source torrent client. It features a built-in search engine, a web-based interface for remote downloads, sequential downloading options, and detailed bandwidth scheduling.
This guide provides step-by-step terminal instructions for installing and configuring qBittorrent on Ubuntu 26.04, 24.04, and 22.04 LTS. We cover native PPA setup, Flatpak container overrides, and headless server configuration using qbittorrent-nox.
If you encounter any configuration or setup errors, please feel free to drop a comment below or contact us directly for support. Our team is always here to help you get it resolved.
Official Stable PPA, Flatpak & Nox Daemon Guides
Configure the ideal torrent downloading environment on your Ubuntu machine. Add the developer PPA, manage Flatpak sandbox storage overrides, and establish a headless daemon service with Web UI access.
Choosing the correct installation method determines how your client is sandboxed and how frequently qBittorrent receives updates. Review the comparison below to select the setup that matches your environment.
qBittorrent Installation Methods Compared
Review the installation options below to understand security, package sources, update frequency, and sandboxing details.
| Method | Package Source | Updates Delivery | Sandboxing & Security | System Integration |
|---|---|---|---|---|
| APT PPA (Launchpad) | Launchpad stable repository (Official) | Rapid updates directly from developer PPA | None (Unconfined local system access) | Excellent. Full disk access, standard theme matching. |
| Flatpak (Flathub) | Flathub container hub (Official) | Managed via Flatpak client updates | Strictly sandboxed container isolation | Requires filesystem overrides for custom folders. |
| Headless (qbittorrent-nox) | APT / Launchpad PPA (Official) | Standard system packages updating | None (Runs under daemon system user) | Tailored for servers. Controlled via Web UI on port 8080. |
Method 1: Install qBittorrent via APT & Official PPA
Installing qBittorrent through the native package manager ensures that it integrates well with your desktop notifications and correctly handles magnet links. By adding the official stable Launchpad PPA, you will get the latest version directly from the developers and stay up to date.
Add the official PPA to your system’s software sources:
sudo add-apt-repository ppa:qbittorrent-team/qbittorrent-stable -y
Update your package list so Ubuntu sees the new repository:
sudo apt update
Run the install command to download and install the qBittorrent desktop program:
sudo apt install qbittorrent -y
Method 2: Install qBittorrent via Flatpak (Flathub)
If you want to keep the application isolated from the rest of your system, you can use the Flatpak version from Flathub. Because Flatpak apps are sandboxed for safety, they cannot access your folders by default. You will need to apply a permission override if you want to save downloads outside of your main Downloads folder.
If Flatpak is not yet configured on your computer, install it and add the Flathub repository:
sudo apt install flatpak -y
flatpak remote-add --if-not-exists flathub https://dl.flathub.org/repo/flathub.flatpakrepo
Tip: If you are setting up Flatpak for the first time, reboot your system to reload desktop menu paths.
Install the official qBittorrent application from Flathub:
flatpak install flathub org.qbittorrent.qBittorrent -y
By default, Flatpak limits qBittorrent to folders like ~/Downloads. If you want to save files to an external hard drive, secondary drive, or custom folder, you must grant permission using this command:
# Replace /media/MyStorage with your actual downloads directory path
flatpak override --user --filesystem=/media/MyStorage org.qbittorrent.qBittorrent
Alternatively, you can manage Flatpak container settings graphically by installing the Flatseal permission editor utility:
sudo flatpak install flathub com.github.tchx84.Flatseal -y
Open Flatseal, select qBittorrent, scroll to the Filesystem section, and add your target directory path under Other files.
Method 3: Set Up Headless qBittorrent (qbittorrent-nox) as a Daemon
For Ubuntu servers without a graphical desktop, you can install the lightweight, terminal-only version called qbittorrent-nox. This allows you to manage your downloads remotely using a web browser interface on port 8080.
Install the headless qBittorrent package:
sudo apt install qbittorrent-nox -y
For better security, create a dedicated system user account to run the program in the background without admin privileges:
sudo adduser --system --group qbittorrent-nox
Create a systemd service file to manage the program in the background:
sudo nano /etc/systemd/system/qbittorrent-nox.service
Paste the following service configuration into the editor:
[Unit]
Description=qBittorrent-nox Service
Wants=network-online.target
After=network-online.target nss-lookup.target

[Service]
Type=exec
User=qbittorrent-nox
Group=qbittorrent-nox
ExecStart=/usr/bin/qbittorrent-nox
Restart=on-failure

[Install]
WantedBy=multi-user.target
Reload systemd, set the service to start automatically at boot, and run the program:
sudo systemctl daemon-reload
sudo systemctl enable qbittorrent-nox.service
sudo systemctl start qbittorrent-nox.service
Verify that the daemon is active and running in the background: sudo systemctl status qbittorrent-nox.service.
To manage your downloads, open a web browser on your network and navigate to http://your-server-ip:8080 (or http://localhost:8080 if running locally).
For security reasons, starting in version 4.6.1+, qBittorrent disabled the default adminadmin password. On startup, a temporary random password is printed in your logs. To retrieve this password, run the following command:
sudo journalctl -u qbittorrent-nox.service --no-pager | grep password
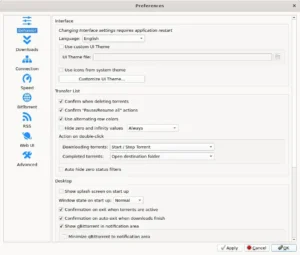
Use username admin and the retrieved password to log in. Once logged in, go to the Tools > Options > Web UI settings tab to set a new, permanent custom username and password.
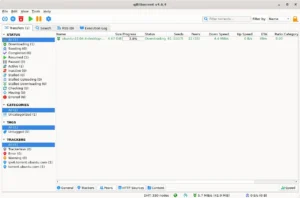
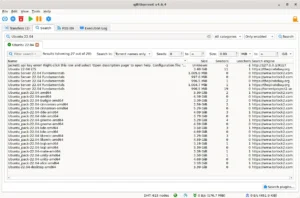
qBittorrent Desktop User Interface Gallery
Below is a screenshot gallery demonstrating the active qBittorrent desktop user interface running on Ubuntu, showing active torrent downloads and system settings menus.
-
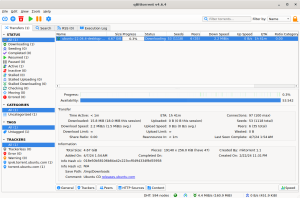
- Main window expanded from qBittorrent on Ubuntu 24.04: Install Guide & Tips
-
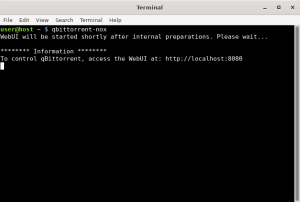
- Qbittorrent headless mode from qBittorrent on Ubuntu 24.04: Install Guide & Tips
qBittorrent Video Setup Guide
If you prefer a visual walkthrough, you can watch our step-by-step video tutorial demonstrating the Launchpad PPA setup, Flathub container package installations, filesystem sandbox overrides, and headless daemon setups:
How to Completely Uninstall qBittorrent and Revert System Changes
If you want to remove qBittorrent, choose the steps below that match your installation method. This will remove the packages, repositories, and local configuration files.
Uninstall the application packages depending on your active installation format:
For APT and PPA installations:
sudo apt remove qbittorrent qbittorrent-nox -y
sudo apt autoremove --purge -y
For Flatpak (Flathub) installations:
flatpak uninstall org.qbittorrent.qBittorrent -y
flatpak uninstall --unused -y
For headless daemon (systemd) installations:
sudo systemctl stop qbittorrent-nox.service
sudo systemctl disable qbittorrent-nox.service
sudo rm /etc/systemd/system/qbittorrent-nox.service
sudo systemctl daemon-reload
sudo apt remove qbittorrent-nox -y
sudo apt autoremove --purge -y
sudo deluser qbittorrent-nox
If you added the qBittorrent stable Launchpad PPA, delete it from your system configuration directory to prevent update repository warnings:
sudo add-apt-repository --remove ppa:qbittorrent-team/qbittorrent-stable -y
sudo apt update
To delete all saved configuration settings, resume states, and cached log files, execute the clean commands matching your package manager:
# Clean native APT configuration files
rm -rf ~/.config/qBittorrent ~/.local/share/qBittorrent

# Clean Flatpak application caches
rm -rf ~/.var/app/org.qbittorrent.qBittorrent
Refer to the following resources for community support and official documentation:
Frequently Asked Questions
What is the official qBittorrent PPA and should I use it on Ubuntu 26.04?
The official qBittorrent stable PPA is ppa:qbittorrent-team/qbittorrent-stable. It is recommended for Ubuntu 26.04, 24.04, and 22.04 LTS to receive the latest stable client releases (like v5.2.2 in 2026) directly from the developers, bypassing older packages in the default repositories.
Why does my Flatpak qBittorrent show permission errors or fail to download files?
Flatpak packages run in a sandboxed container. By default, the sandbox restricts file access. To download files to directories outside standard paths (like external drives or custom directories), you must run flatpak override --user --filesystem=/path/to/directory org.qbittorrent.qBittorrent in the terminal, or use the Flatseal GUI tool.
What are the default credentials for the qBittorrent-nox Web UI?
Starting with qBittorrent v4.6.1+, the default adminadmin password is disabled. The daemon now generates a temporary random password on startup and prints it to the console or systemd journal. You can view it by running journalctl -u qbittorrent-nox.service, or reset it by deleting password entries in qBittorrent.conf.
Are there official Snap packages for qBittorrent in the Snap Store?
No, there are no official Snap packages maintained by the qBittorrent team. The existing qBittorrent Snap packages are community-contributed, and some have been abandoned or left unmaintained. To ensure stability and security, we recommend using the official stable APT PPA or Flathub Flatpak methods instead.
How do I reset my qBittorrent Web UI password if I cannot find it?
First, stop the qBittorrent service. Open ~/.config/qBittorrent/qBittorrent.conf in a text editor, locate the Preferences section, and delete the WebUI\Password_PBKDF2 line (and any other WebUI password or username variables). Save the file and restart the service; on restart, the daemon will generate a new temporary random password printed in the system log, which you can use to log in and set a custom password in the Web UI settings.
Related torrent guides: Best Torrent Clients On Ubuntu · Install uTorrent on Ubuntu · Install Deluge on Ubuntu · Install KTorrent on Ubuntu