


Geary is a lightweight, modern email client designed specifically for the GNOME desktop environment. Unlike traditional email clients that pack countless menus, Geary focuses on speed and simplicity.
It features a clean three-pane layout, unified search, desktop notifications, and a conversation-based message view that groups related emails into a single, cohesive thread.
Frequently listed among the best email clients for Ubuntu, Geary is great for users who want an efficient, native-looking mail application that integrates seamlessly with online accounts and system notifications.
This guide provides step-by-step terminal instructions for installing Geary on Ubuntu 26.04, 24.04, and 22.04 LTS. We also outline local configuration folders, explain how to resolve common keyring or Wayland rendering bugs, and detail clean uninstallation procedures for all formats.
If any of these steps fail on your system, please drop a comment below or contact us and we will help you get it resolved.
APT & Flatpak Step-by-Step
Install and configure the lightweight Geary email client on your Ubuntu machine. Learn how to use the native APT repository, add the Flathub remote for Flatpak, and manage local profile directories.
Your choice of installation method determines how quickly you receive updates and how the application interacts with your system files. While the APT method is lightweight and uses native library files, Flatpak isolates the application for improved security. Running both formats in parallel can result in duplicate desktop icons and conflicting configuration files, so we recommend selecting just one installation source.
Geary Installation Methods Compared
Review the table below to compare update cycles, system isolation, and package management behaviors before deciding on an installation route.
| Method | Package Format | Auto Updates | Sandboxed | Best For |
|---|---|---|---|---|
| APT Package | Native Debian (.deb) | Yes (via system upgrade) | No | Users seeking native performance with minimal disk overhead |
| Flatpak (Flathub) | Flatpak (org.gnome.Geary) | Yes (via flatpak update) | Yes | Users who want the latest version on older Ubuntu releases |
| Snap Store | Not Available | N/A | N/A | Not supported (the GNOME community does not publish a Snap) |
Method 1: Install Geary via the Official Ubuntu Repository (APT)
The standard way to install Geary on Ubuntu is through the default APT package manager. This retrieves the package directly from Ubuntu’s universe repository. Because this package uses shared system libraries, it requires very little disk space. Security patches are applied automatically whenever you run standard system software updates.
Since LTS releases prioritize system stability, the version provided in the APT repositories may not always be the absolute newest release. Ubuntu 22.04 LTS carries Geary 40.0, Ubuntu 24.04 LTS carries Geary 44.1, and Ubuntu 26.04 LTS features Geary 46.0. If you require the absolute latest features, we recommend using the Flatpak method instead.
Open a terminal window using the keyboard shortcut Ctrl+Alt+T and run the installation commands:
sudo apt update && sudo apt install geary -y
After the command finishes, you can launch Geary directly from your desktop desktop menu or by typing geary in your terminal window.
Method 2: Install Geary via Flatpak (Flathub)
The GNOME developer community officially packages and recommends Geary as a Flatpak via Flathub. Flatpak runs applications inside a self-contained sandbox environment, keeping them isolated from your primary operating system files. Runtimes and configuration data are stored separately, which increases overall download size and disk space (container overhead) but ensures you run the absolute latest stable version on all Ubuntu releases.
Because Flatpak applications run inside an isolated sandbox container, they have restricted filesystem access. If you need to attach files from external partitions or network mounts, you can override these boundaries using the permission commands detailed in Step 4 below.
If you have not configured Flatpak on your machine yet, install the service files from the repository:
sudo apt update && sudo apt install flatpak -y
Enable the official Flathub repository so your system can query and fetch the Geary application files:
sudo flatpak remote-add --if-not-exists flathub https://dl.flathub.org/repo/flathub.flatpakrepo
Retrieve the verified application build directly from the remote server:
flatpak install flathub org.gnome.Geary -y
If the sandboxed version displays “Permission Denied” errors when you attempt to attach files from external mounts, grant filesystem permissions via Flatpak overrides:
# Allow access to secondary drives mounted under /media
flatpak override --user --filesystem=/media org.gnome.Geary

# Allow access to mounts under /mnt
flatpak override --user --filesystem=/mnt org.gnome.Geary

# Grant full host filesystem read/write access
flatpak override --user --filesystem=host-os org.gnome.Geary
To revert these permission adjustments and restore the application to its default secure isolation: flatpak override --user --reset org.gnome.Geary.
Method 3: Geary Snap Store Availability Status
Many Ubuntu users look for Geary in the Snap Store since Snap support is pre-installed on the operating system. However, there is no official or maintained Snap package for Geary. The GNOME developers prioritize Flatpak as their containerized distribution standard, and no community members maintain a Snap version.
Attempting to install Geary via the terminal command sudo snap install geary will fail because there is no registered store package. If you see third-party sites hosting unofficial Geary Snaps, do not install them. They are unmaintained, do not receive safety patches, and will likely fail to connect to your email provider. For a secure, sandboxed container experience, choose the **Flatpak method** instead.
Geary Profile and Configuration Paths
Geary stores your email account credentials, UI preferences, and local mail databases in your user directory. The local mail database is managed as an SQLite file containing cached email indexes and message bodies. The exact location of these files depends on the format you selected during setup. Knowing these paths is essential if you plan to back up your mail cache or switch from an APT install to a Flatpak.
~/.config/geary/• Native APT Email Data & Caches:
~/.local/share/geary/• Flatpak Sandbox Configuration:
~/.var/app/org.gnome.Geary/config/geary/• Flatpak Sandbox Email Data & Caches:
~/.var/app/org.gnome.Geary/data/geary/Ensure Geary is completely closed before executing copy operations to prevent database corruption. Run the command block that aligns with your migration plan:
# 1. Back up native APT profile data to a backup folder
mkdir -p ~/geary-backup/
cp -a ~/.config/geary ~/geary-backup/
cp -a ~/.local/share/geary ~/geary-backup/

# 2. Migrate native APT settings to Flatpak sandbox
mkdir -p ~/.var/app/org.gnome.Geary/config/
cp -a ~/.config/geary ~/.var/app/org.gnome.Geary/config/
mkdir -p ~/.var/app/org.gnome.Geary/data/
cp -a ~/.local/share/geary ~/.var/app/org.gnome.Geary/data/

# 3. Migrate Flatpak settings back to native APT directories
mkdir -p ~/.config/
cp -a ~/.var/app/org.gnome.Geary/config/geary ~/.config/
mkdir -p ~/.local/share/
cp -a ~/.var/app/org.gnome.Geary/data/geary ~/.local/share/
Copying data using the -a flag preserves file permissions, ensuring the new installation format has full access to the database.
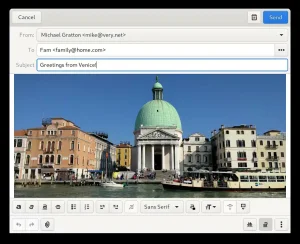
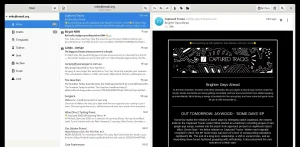
Geary User Interface Gallery
Below is a screenshot gallery showcasing the clean desktop layout and thread views of the Geary mail application running on Ubuntu.

How to Completely Uninstall Geary from Ubuntu
Standard package removal commands only delete application binary files. They leave behind local cache databases, attachments, and email account credentials. To perform a clean, complete system removal, you must uninstall the package files and manually delete the directories containing your downloaded email archives.
1. Remove the Flatpak Package:
flatpak uninstall -y org.gnome.Geary
flatpak uninstall --unused -y
2. Remove the APT Package:
sudo apt purge -y geary
sudo apt autoremove -y
3. Delete Leftover Local Email Data and Configuration Files:
Verify you have backed up any unique drafts, then run the cleanup commands corresponding to your removed format:
# Delete native APT cache files and settings directories
rm -rf ~/.config/geary/ ~/.local/share/geary/

# Delete Flatpak sandbox data directories
rm -rf ~/.var/app/org.gnome.Geary/
Troubleshooting Common Geary Issues on Ubuntu
Below are resolution steps for the most common issues users encounter with Geary on Ubuntu, including OAuth login authentication loop failures and graphical interface bugs under Wayland environments.
When adding modern accounts like Gmail or Microsoft Outlook, Geary may continuously prompt for your password or show an authentication error. The login screen loops, and the setup cannot finish.
Root Cause: Geary stores modern OAuth tokens inside the system keyring via a helper library (libsecret). If automatic login is enabled on Ubuntu, your desktop keyring remains locked at startup because no login password was provided to decrypt it. Geary cannot write or read the secure tokens without the decrypted keyring.
Fix Option 1 – Link via GNOME Online Accounts (Recommended):
Instead of adding your account directly inside Geary, link it to the desktop session. Open Settings > Online Accounts in Ubuntu and log in there. Geary will automatically detect your credentials from the desktop environment and bypass the keyring prompt.
Fix Option 2 – Synchronize Keyring Password via Seahorse:
# Install Seahorse (the system keyring utility) if not already installed
sudo apt install seahorse gnome-keyring -y

# Open Seahorse from your application menu
# Navigate to: Passwords > Login keyring
# Right-click > Change Password
# Change the password to match your current Ubuntu user login password
If you prefer automatic login but want to stop password prompts, you can set the Login keyring password to blank, though this leaves local passwords unencrypted on disk.
If you are running Ubuntu under a Wayland session with NVIDIA proprietary drivers, the Geary window may open as a solid black block or flicker continuously.
Root Cause: Geary uses a web layout engine (WebKitGTK) to format and display email content. Certain graphics drivers conflict with WebKit’s newer direct memory rendering path (DMA-BUF) on Wayland.
Fix: Disable DMA-BUF rendering in WebKit:
# Test launching from the terminal with the override variable:
WEBKIT_DISABLE_DMABUF_RENDERER=1 geary

# If the window displays correctly, make the change permanent:
cp /usr/share/applications/org.gnome.Geary.desktop ~/.local/share/applications/
nano ~/.local/share/applications/org.gnome.Geary.desktop

# Edit the Exec= line to match:
# Exec=env WEBKIT_DISABLE_DMABUF_RENDERER=1 geary %u
If your installation process gets interrupted or fails halfway, you can repair your package manager databases and resume setup using the recovery commands below:
sudo dpkg --configure -a to repair interrupted package configurations, followed by sudo apt install -f to resolve broken dependencies.• For Flatpak issues: Run
flatpak repair to scan and repair your local Flatpak installation runtime files if packages fail to launch.Once the repair commands complete, simply re-run your original install command (sudo apt install geary or flatpak install flathub org.gnome.Geary) to finish the setup.
Use these official development links for troubleshooting assistance and community discussions:
Geary for Ubuntu FAQ
Find quick answers to common questions about installing, configuring, and maintaining Geary on Ubuntu.
Is Geary free to use on Ubuntu?
Yes. Geary is completely free and open-source software, distributed under the GNU Lesser General Public License (LGPL v2.1+). You can use it without any subscription fees or feature restrictions.
How do I install Geary on Ubuntu using APT?
Open your terminal using Ctrl+Alt+T and run: sudo apt update && sudo apt install geary -y. This installs the stable package version from Ubuntu’s default universe repository.
Is there an official Snap package for Geary?
No. Geary does not have an official or maintained Snap package in the Snap Store. The GNOME developer community publishes and maintains Geary using the Flatpak format on Flathub, and as a native APT package in Ubuntu’s repositories.
Where does Geary store its local email databases and configuration settings?
For native APT installs, configuration is at ~/.config/geary/ and email databases are at ~/.local/share/geary/. For Flatpak installs, files are stored inside ~/.var/app/org.gnome.Geary/config/geary/ and ~/.var/app/org.gnome.Geary/data/geary/.
How do I completely uninstall Geary and delete all stored emails from Ubuntu?
Remove the application using your installation tool. For APT: sudo apt purge -y geary. For Flatpak: flatpak uninstall -y org.gnome.Geary. Then delete the local data directories by running: rm -rf ~/.config/geary ~/.local/share/geary (for APT) or rm -rf ~/.var/app/org.gnome.Geary (for Flatpak).
More email client guides: Best Email Clients for Ubuntu · Thunderbird for Ubuntu · Mailspring for Ubuntu · Install BlueMail on Ubuntu