


Terminator is a tiling terminal emulator that lets you split one window into multiple resizable terminals in a grid. It is perfect if you want to run several commands side by side without opening lots of windows.
This guide shows you how to install Terminator on Ubuntu 26.04, 24.04, and 22.04 LTS. We cover the official APT package, the PPA for the latest version, and how to build from GitHub source. You will also learn how to set it as your default terminal, use layouts and shortcuts, and uninstall it cleanly.
If something does not work, leave a comment or contact us and we will help you fix it.
APT, PPA, & GitHub Manual Setup Walkthroughs
Configure the Terminator window-splitting emulator on your system. Learn how to register repositories, build from source tarballs, set default terminal alternatives, manage layout profiles, and resolve environment issues.
Choosing the correct installation method determines how quickly you receive updates and how dependencies are managed. Review the comparison grid below to select the option that best fits your requirements.
Terminator Installation Methods Compared
Evaluate software updates, containment levels, filesystem access permissions, and desktop integration capabilities for each installation type.
| Method | Source | Ubuntu 26.04 | Ubuntu 24.04 | Ubuntu 22.04 | Sandbox | Updates | Recommended Path |
|---|---|---|---|---|---|---|---|
| APT Universe | Ubuntu Universe Archive | v2.1.5.x | v2.1.3.x | v2.1.1.x | None | Standard OS updates | Yes, recommended on Ubuntu 26.04 |
| Launchpad PPA | gnome-terminator/ppa | v2.1.5 (Upstream) | v2.1.5 (Upstream) | v2.1.5 (Upstream) | None | System updates via APT | Recommended for older Ubuntu LTS releases |
| GitHub Tarball | Official Releases | v2.1.5 (Upstream) | v2.1.5 (Upstream) | v2.1.5 (Upstream) | None | Manual rebuild required | Alternative if PPA/Universe repositories are restricted |
Method 1: Install Terminator via the Ubuntu Universe Archive (APT)
Installing Terminator through the default APT package manager is the standard method for users looking for native performance and clean desktop integration. Because Terminator resides in Ubuntu’s Universe repository, the package uses shared system libraries and matches your desktop theme naturally. Runtimes are updated automatically alongside your standard system software updates.
Since stable LTS releases prioritize package freezes, the version available in the APT repositories tracks the version freeze at release time. Ubuntu 22.04 LTS carries Terminator v2.1.1.x, Ubuntu 24.04 LTS carries Terminator v2.1.3.x, and Ubuntu 26.04 LTS features Terminator v2.1.5.x. If you require the absolute latest release version on older Ubuntu LTS releases, use the Launchpad PPA method instead.
Most desktop editions have Universe enabled. On minimal installations or server packages, ensure it is added to your software sources:
sudo add-apt-repository universe -y
Update your APT repository indexes to fetch the package definitions:
sudo apt update
Install Terminator from the Universe archive. APT will automatically download and install the required dependencies (such as Python GTK bindings and terminal libraries):
sudo apt install terminator -y
Method 2: Install Terminator via the Launchpad PPA
If you run an older Ubuntu LTS release (such as 22.04 or 24.04) and want to use the latest stable version of Terminator (v2.1.5), adding the official PPA is the recommended choice. By adding this Launchpad repository, your system integrates updates directly into the system update manager, matching standard package updates.
Ensure your system has the utility package installed to manage software repository properties:
sudo apt update && sudo apt install software-properties-common -y
Add the official PPA repository to pull verified stable updates:
sudo add-apt-repository ppa:gnome-terminator/ppa -y
Note: If you encounter specific library dependency issues on older distributions, the community PPA at ppa:mattrose/terminator is a secondary fallback option maintained for older library environments.
Sync package indexes to recognize the new PPA repositories and install the software:
sudo apt update
sudo apt install terminator -y
Method 3: Build and Install Terminator from GitHub Source
For users who want full control over compilation or need to install Terminator in environments where external Launchpad repositories are blocked, building directly from the upstream source code is the cleanest approach. Because terminal emulators require unconfined host access, Terminator does not have official Flatpak or Snap packages. The source compilation method ensures a native installation without sandbox limitations.
Terminator is written in Python and uses the GTK3 toolkit. Install the required build libraries, translation systems, and interpreter assets:
sudo apt update && sudo apt install python3 python3-gi python3-gi-cairo python3-dbus python3-psutil python3-xlib libglib2.0-bin gettext intltool -y
Fetch the stable release tarball (v2.1.5) directly from the official gnome-terminator GitHub releases page and extract it:
wget https://github.com/gnome-terminator/terminator/releases/download/v2.1.5/terminator-2.1.5.tar.gz
tar -zxvf terminator-2.1.5.tar.gz
cd terminator-2.1.5
Compile the source configuration setup file and install the binaries on your host system. We use the --record option to log the exact location of all installed files, making future cleanup simple:
sudo python3 setup.py install --record=install-files.txt
How to Update and Upgrade Terminator
Keeping Terminator updated ensures you receive the latest security fixes, window management enhancements, and compatibility adjustments. The upgrade process depends on the installation method you chose.
Since both methods register with Ubuntu’s package manager, you can update Terminator along with all other system software by running:
sudo apt update && sudo apt upgrade -y
When a new stable release is published on GitHub, you must download the new source code, extract it, and execute the installation setup command again to replace old binaries:
# Example for upgrading to a newer version (replace v2.1.5 with current)
wget https://github.com/gnome-terminator/terminator/releases/download/v2.1.5/terminator-2.1.5.tar.gz
tar -zxvf terminator-2.1.5.tar.gz
cd terminator-2.1.5
sudo python3 setup.py install --record=install-files.txt
Verify the Terminator Installation
To confirm that Terminator is correctly configured and verify the version running on your system, execute the version query flag in your terminal:
terminator --version
The terminal will output the active software version. For example: terminator 2.1.5
How to Launch and Configure Terminator as Default
You can launch Terminator directly from your graphical desktop launcher or execute commands from an existing terminal window. You can also configure Terminator as the system-wide default handler for all terminal requests.
Press the Super key to open your desktop application menu, type Terminator in the search bar, and click the application icon to launch the graphical client.
To start the emulator from your current terminal shell, run:
terminator
To configure your Ubuntu system to launch Terminator instead of the default GNOME Terminal when using the standard keyboard shortcut Ctrl+Alt+T, run the system alternatives configuration command:
sudo update-alternatives --config x-terminal-emulator
The terminal will display a list of installed emulators. Select the index number that corresponds to the path /usr/bin/terminator and press Enter to save your selection.
Essential Terminator Keyboard Shortcuts
Terminator relies heavily on keyboard shortcuts to split windows, manage tabs, and adjust layouts. Mastering these key combinations allows you to navigate complex developer environments without touching your mouse.
1. Window and Pane Management
| Keyboard Shortcut | Action / Command Description |
|---|---|
| Ctrl + Shift + E | Split the active terminal pane vertically (side-by-side) |
| Ctrl + Shift + O | Split the active terminal pane horizontally (top-and-bottom) |
| Alt + Arrow Key | Navigate between split terminal panes in the direction of the arrow |
| Ctrl + Shift + W | Close the current active terminal pane |
| Ctrl + Shift + X | Maximize the active pane to fill the window (toggle back to restore layout) |
| Ctrl + Shift + S | Toggle scrollbar visibility on the active terminal pane |
| Ctrl + Shift + Q | Close all split terminals, close the window, and exit the application |
2. Tab Management
| Keyboard Shortcut | Action / Command Description |
|---|---|
| Ctrl + Shift + T | Open a new terminal tab within the window container |
| Ctrl + PageUp / PageDown | Cycle navigation focus to the previous or next tab |
| Ctrl + Shift + N | Move focus to the next terminal split within a pane group |
| Ctrl + Shift + P | Move focus to the previous terminal split within a pane group |
| Ctrl + Shift + Alt + A | Rename the active tab title header |
3. Text, Search, and Zoom Management
| Keyboard Shortcut | Action / Command Description |
|---|---|
| Ctrl + Shift + C | Copy the selected text characters to the system clipboard |
| Ctrl + Shift + V | Paste text content from the clipboard into the active pane |
| Ctrl + Shift + F | Open the text search tool at the bottom of the active pane |
| Ctrl + Plus (+) / Ctrl + = | Increase active terminal font size (Zoom in) |
| Ctrl + Minus (-) | Decrease active terminal font size (Zoom out) |
| Ctrl + Zero (0) | Reset terminal font scaling to standard configuration defaults |
| Ctrl + Mouse Scroll | Zoom terminal font sizes in or out dynamically using the mouse scroll wheel |
Important: Broadcasting input (sending key presses to all split panes simultaneously) is unassigned by default in the software configuration. You can configure this keybinding in Preferences > Keybindings under the “Broadcast to all” action, or use the default shortcut modifier Ctrl+Shift+K to open the broadcast menu options.
Configuring Profiles and Custom Layouts
Terminator stores all layout definitions, keyboard bindings, color options, and profile rules inside a single local text configuration file at the path ~/.config/terminator/config. The software does not check a system-wide fallback directory in /etc, meaning all layout modifications are local to your user space.
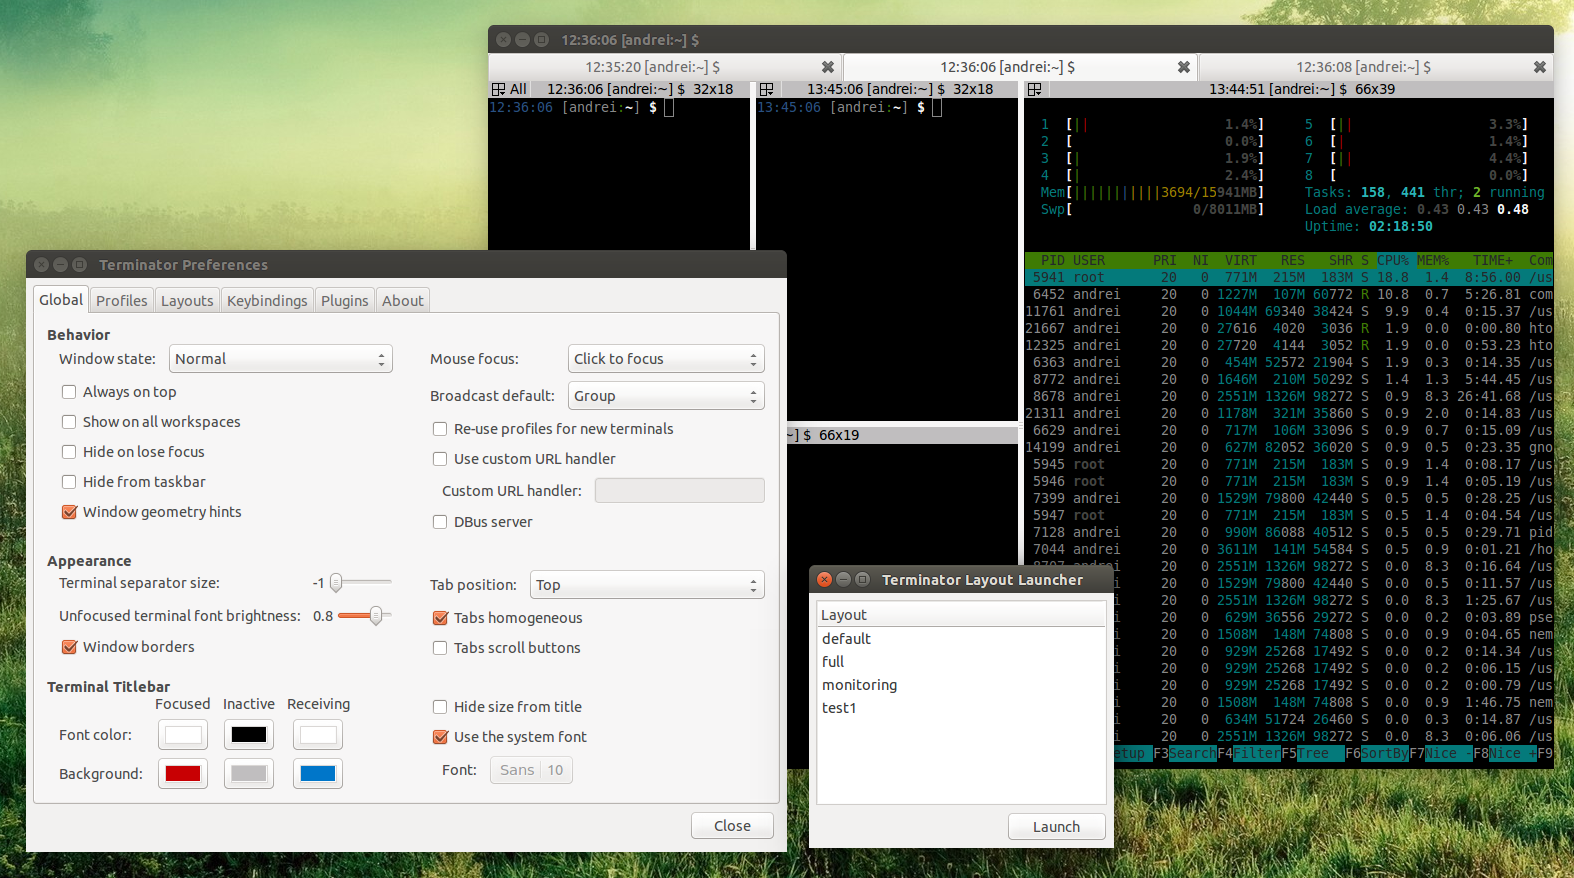
You can adjust configuration rules from the graphical preferences panel (right-click in Terminator and select Preferences), or write rules directly to the configuration file using a standard text editor. Review the structural layout syntax example below:
[global_config]
  title_transmit_bg_color = "#CC0000"
[keybindings]
  broadcast_all = "k"
[profiles]
  [[default]]
    background_color = "#1A1A1A"
    foreground_color = "#F5F0EE"
    cursor_color = "#FF3333"
[layouts]
  [[default]]
    [[[child1]]]
      type = Terminal
      parent = window0
    [[[window0]]]
      type = Window
      parent = ""
[plugins]
If you experience layout corruption or want to revert all keybindings back to their standard settings, close the software, delete the configuration file, and launch Terminator to regenerate a clean default version: rm ~/.config/terminator/config.
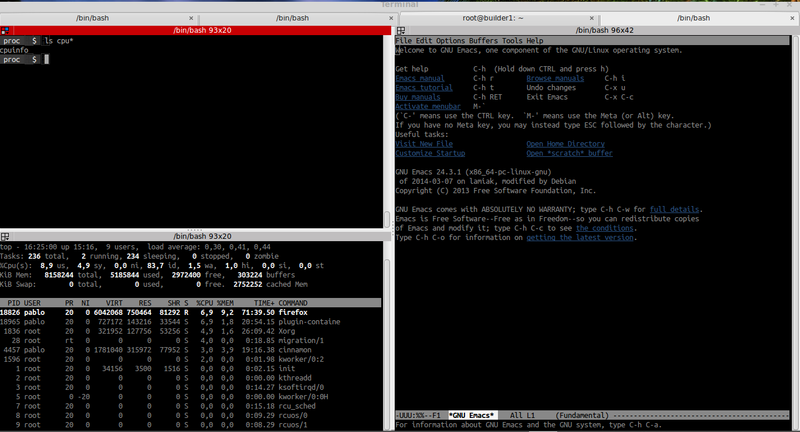
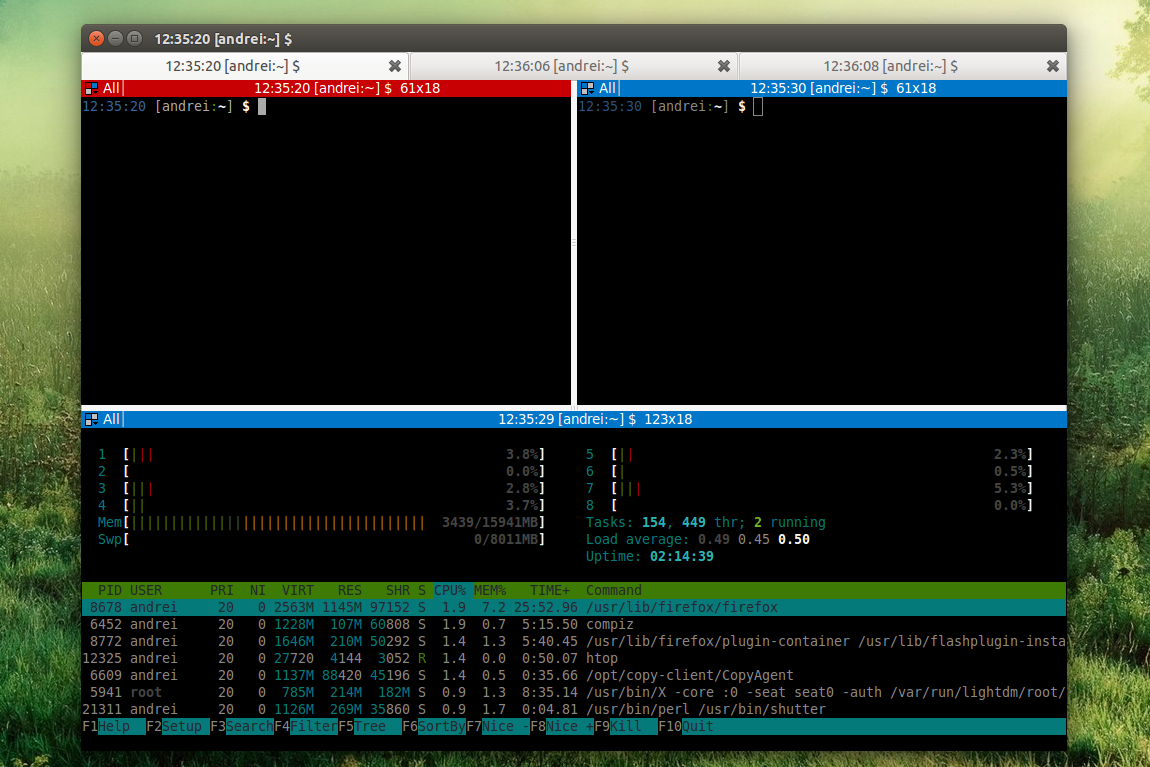
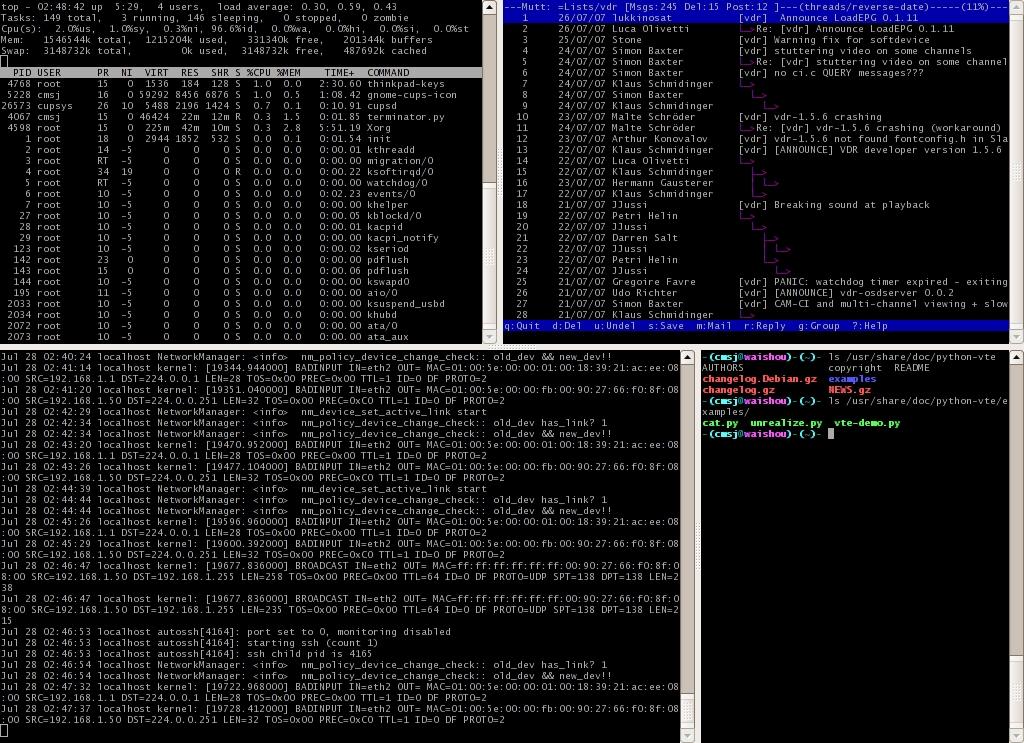
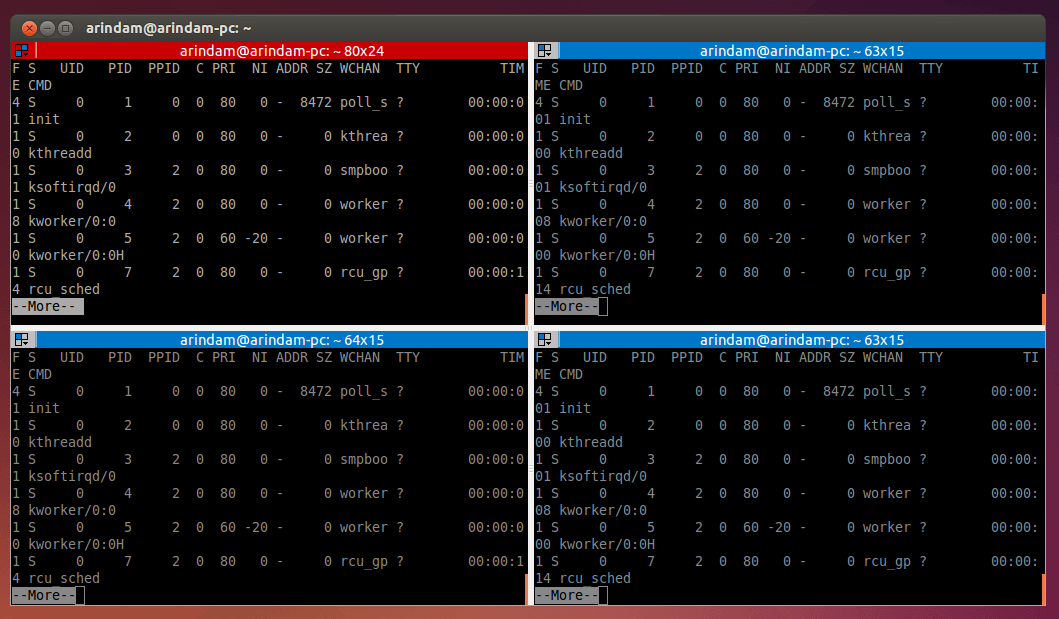
Interface Screenshots
See what the Terminator emulator interface looks like running on the Ubuntu desktop, configured with split panes, layouts, and custom theme profiles.
Troubleshooting Common Terminator Issues
Below are common issues you might run into when installing or running Terminator on Ubuntu, along with their solutions.
This occurs when you attempt to install Terminator on a system that does not have the Ubuntu Universe package repository enabled. To resolve the package discovery failure, register the Universe component and resync package listings:
sudo add-apt-repository universe -y && sudo apt update
If you run Terminator over an SSH connection and receive errors like Unable to init server: Could not connect or Display environment variable not set, the server cannot route graphical window requests to your local display manager. To launch the application over SSH sessions, connect with X11 forwarding enabled:
# Connect with X11 forwarding enabled
ssh -X user@your-server-ip
Minimal installations of Ubuntu (such as server or container editions) lack the properties manager. To add repositories without syntax faults, install the base software properties utility first:
sudo apt update && sudo apt install software-properties-common -y
If you upgrade your Ubuntu system to a newer LTS release (for example, from 24.04 to 26.04), old Terminator PPA configuration links can cause dependency conflicts or crash system updates. To clean up PPA records, use the Launchpad repository purging command to safely downgrade Terminator to repository defaults:
sudo apt install ppa-purge -y
sudo ppa-purge ppa:gnome-terminator/ppa
This removes PPA configuration links, deletes conflict binaries, and reinstalls the stable Universe archive version.
How to Completely Uninstall Terminator and Remove Cache Files
If you want to remove Terminator from your system, follow the cleanup instructions below that correspond to your active installation method. These steps remove the application, clean up PPA records, and delete local user configuration files.
For APT and PPA installations, uninstall the core application using the package manager:
sudo apt remove terminator -y
To clean up orphan dependencies, run a dry-run first to preview what will be removed, then perform the actual removal:
sudo apt autoremove --dry-run
sudo apt autoremove -y
For manual GitHub source installations, navigate to the directory where you extracted the source files and remove the recorded files logged during installation:
cat install-files.txt | xargs sudo rm -rf
If you added the Launchpad PPA, delete the repository source files to keep package updates clean:
sudo add-apt-repository --remove ppa:gnome-terminator/ppa -y
sudo apt update
Uninstalling the package leaves custom profiles on your system to prevent data loss. To delete these settings completely, clear the local config directory:
rm -rf ~/.config/terminator
Warning: This permanently deletes all your custom profiles, color themes, keybindings, and split layouts. Back up your files first if you intend to reuse them: cp -r ~/.config/terminator ~/.config/terminator_backup.
To verify that the application has been completely uninstalled and no packages remain on the host, query the package status using the policy tool:
dpkg-query -l terminator
Use the links below to access the official community forums, source code repositories, and documentation files for Terminator:
Frequently Asked Questions
Is Terminator maintained?
Yes, Terminator is actively maintained by the community on GitHub. The project has moved to the gnome-terminator organization where developers continue to release bug fixes, updates, and compatibility improvements for modern Linux distributions.
Does Terminator work on Wayland?
Terminator has partial support for Wayland. While most features, including window splitting, custom layouts, and tab management, function correctly, some advanced features like global broadcast shortcuts or specific window positioning rules may exhibit issues. If you experience scaling or input problems under Wayland, you can run Terminator under XWayland or switch your desktop session to X11.
Why is Terminator not available as a Flatpak or Snap?
Terminator is not officially packaged on Flathub or the Snap Store because a terminal emulator requires direct, unconfined access to the host operating system’s shell, system binaries, and user files. Running a terminal emulator within a strict sandbox container restricts its basic utility, making native APT, PPA, or source installations the preferred distribution methods.
How do I enable broadcast input in Terminator?
To broadcast your keystrokes to all terminal panes simultaneously, you can configure the broadcast keyboard shortcut in your preferences. By default, it is unassigned, but you can set it in Settings > Keybindings under the “Broadcast to all” action, or use the default shortcut modifier key combination (Ctrl+Shift+K) to open the broadcast menu options.
How do I downgrade Terminator from PPA to the official repository version?
To revert to the standard Ubuntu repository package, install the ppa-purge utility and run it against the target PPA: sudo apt install ppa-purge -y && sudo ppa-purge ppa:gnome-terminator/ppa. This safely removes PPA packages and downgrades Terminator to the default system version.
How do I save and restore custom window layouts in Terminator?
Open your terminal preferences, navigate to the Layouts tab, and configure your split window layout. Click Add to save your current layout arrangement, name it (e.g., “DevLayout”), and close the settings. To launch Terminator directly into this layout in the future, run: terminator -l DevLayout.
Related terminal emulators: Install Tilix on Ubuntu · Best Terminal Emulators · How to Set Default Terminal Emulator